Setting up a Digital Ocean server for Selenium, Chrome, and Python
Step One: Logging in
When you created your server, you gave it a public key, probably foundations_key.pub. To log onto the server, you need to match that with your private key, the foundations_key file.
Note: If you lose your private key, you lose access to your server! That’s why we (maybe) stored it in a secret location (the
.sshdirectory).
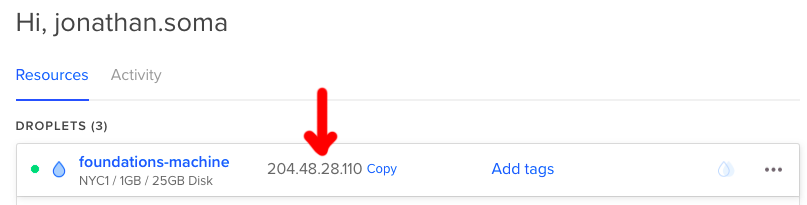
First thing you’ll need is to make sure you know where your keys are.
Second thing you’ll need is to find the IP Address of your server. Mine is 204.48.28.110.
Windows
If you’re using Windows, open up the PuTTY client you installed earlier. The same guide explains how to connect to your server.
OS X
On OS X, you will use the following command to connect to the server. It uses your key to connect to the server’s IP address using the username root. Make sure the path to your key is correct, and make sure you put in your IP address.
Note: The key is the name of the file on your computer, NOT!!! the name you gave the key when creating the server
ssh -i ~/.ssh/foundations_key root@YOUR_IP
For example, your command might be ssh -i ~/.ssh/foundations_key root@12.346.78.90.
Is it not working? Make sure you put in your server’s IP address and did not just copy mine. Make sure you know where your key is.
When it asks you if you’re sure you want to connect, say Yes.
Step Two: Customizing your prompt
The worst thing is when you forget whether you’re on your server or not. The code below will make it very obvious when you are. Cut and paste it into your terminal to run it - make sure you’re connected to your server when you run it!
echo "export PS1=\"\[\033[40m\]\[\033[47m\]server\[\033[0m\] \[\033[31m\]\[\e]0;\u@\h: \w\a\]${debian_chroot:+($debian_chroot)}\u@\h\[\033[0m\]:\w\$ \"" > ~/.bash_profile
source ~/.bash_profile
Step Three: Welcome to your server!
We should probably update the software on there. First you’ll update the software it knows about, then you’ll actually perform an upgrade.
apt is a package manager for Lunux (it’s what Homebrew wants to be).
apt update
apt -y upgrade
The -y means “don’t ask me if I am sure I want to upgrade, because yes I do.”
After you run that, you’ll install mailutils by using apt. It will ask you some questions - mostly you just hit “OK” (tab, then enter or spacebar). The only thing you want to change is the kind of server you want - Local only is a good option. If you miss that, though, it’s no big deal. Install using the following command.
apt install -y mailutils
We won’t be sending mail, but it’s useful to give us notifications when things break (we’ll talk about it later!.
Step Three: Install Python, update pip, and install some packages
We install Python 3 and pip using apt. Note we’re using -y here again.
apt install -y python3 python3-pip
Then we’ll use pip3 to install some packages.
pip3 install --upgrade pip
pip3 install pandas bs4 jupyter selenium
Step Four: Installing Chrome
If we’d like to use Selenium on this machine, we need to install Chrome. It’s a little awkward, though - Chrome isn’t distributed through apt, its open-source brother Chromium is, but we’ll just download the real Chrome because hey why not.
First we’ll install some packages Chrome depends on
apt install -y libxss1 libappindicator1 libindicator7
Then we’ll download the Chrome package - it doesn’t auto-install, though!
wget https://dl.google.com/linux/direct/google-chrome-stable_current_amd64.deb
We’ll use dpkg to try to install it from the package file…
dpkg -i google-chrome*.deb
But it fails! But then we ask apt to come in and clean it up and fix it up and everything becomes okay for some reason.
apt install -y -f
You don’t need to know what you’re doing there, I promise.
Step Five: Installing ChromeDriver
Remember that ChromeDriver thing, the one that lets you use Selenium to control Chrome? We need that, too.
First, we download chromedriver
wget https://chromedriver.storage.googleapis.com/2.40/chromedriver_linux64.zip
It’s a .zip file, which we can’t open yet! Let’s install unzip.
apt install -y unzip
Now we can use the unzip command to… unzip it.
unzip chromedriver_linux64.zip
Now we need to turn it into an executable - something that can be run like a program. To do this we change the mode of the file with chmod to allow executing.
chmod +x chromedriver
Then we move it into somewhere findable, in our PATH.
mv -f chromedriver /usr/local/bin/chromedriver
Step Six: Installing a fake display
Selenium really really wants to use a display, so we need to install a fake one. First, we install the software to support it with apt.
apt install -y xvfb
Then we’ll install the Python modules that connect to it.
pip3 install pyvirtualdisplay
Step Seven: Test it out
Type ipython to open up the interactive Python prompt. Paste in the following code, and see if it displays the title from the NYTimes.
from pyvirtualdisplay import Display
from selenium import webdriver

display = Display(visible=0, size=(800, 600))
display.start()

options = webdriver.ChromeOptions()
options.add_argument('--no-sandbox')

driver = webdriver.Chrome(chrome_options=options)
driver.get('http://nytimes.com')
print(driver.title)
Get crazy
Now you’re good to go! We can move on to sending files back and forth from your server or scheduling repeating tasks